• Home
  • Travel
  • About
  • Ph.D.
  • Writing
  • Art
  • Cigars/Scotch
  • Software Development
  • House Party
  • Golf
  • Misc
  • Ph.D Paper Research
  • Supplemental Materials
  • eu_prepare
  • Home
  • Travel
  • About
  • Ph.D.
  • Writing
  • Art
  • Cigars/Scotch
  • Software Development
  • House Party
  • Golf
  • Misc
  • Ph.D Paper Research
  • Supplemental Materials
  • eu_prepare
KEITH COCHRAN

Raspberry Pi Traffic Light

8/11/2019

Comments

 
My son Alex and I worked on this over the weekend. It's a basic traffic light with a pedestrian button for the raspberry pi. To see a live video of it, check out my youtube channel.
​Here is the code and a schematic:

# Basic Traffic light with pedestrian button.
#
# Usage: sudo python3 pedtraffic.py
#
# This traffic light has adjustable timer durations for the red, yellow,
# and green lights, as well as a pedestrian button. When a pedestrian walks
# up and presses the button, the state of the button is saved and when the
# cycle comes back to green, it allows the pedestrian to walk with a green
# light on the tri-color LED. Once the traffic light goes yellow, the
# pedestrian light flashes blue, indicating they have just a little time to
# continue to cross. Once the traffic light is red, the ped light is also red.
#
# Written by Keith and Alex Cochran 8/10/19
# for Raspberry Pi Model B Rev 2 (26 pin)
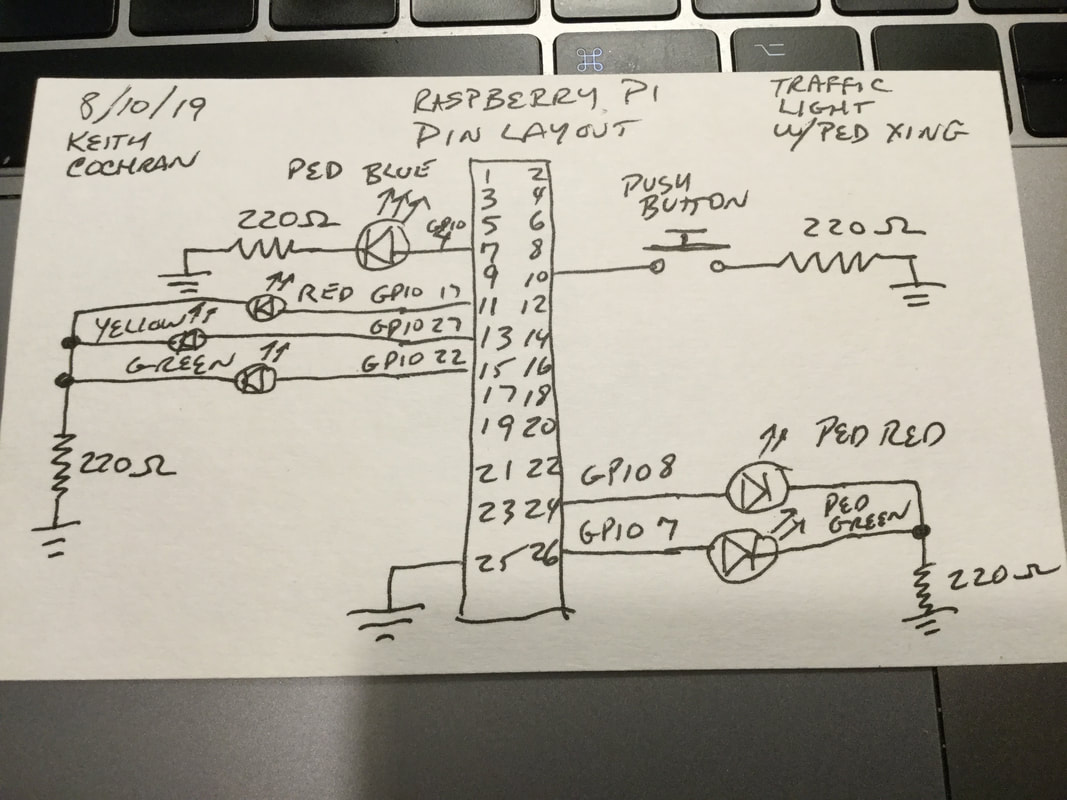
#
# Hardware config:
# red led positive (+) lead to GPIO 17 (pin 11)
# yellow led positive (+) lead to GPIO 27 (pin 13)
# green led positive (+) lead to GPIO 22(pin 15)
# Used 220 ohm resistor to ground all LEDs (pin 25).
#
# Pedestrian button input goes to GPIO 15 (pin 10).
# Tri-color LED GPIOs used on 8, 7 and 4 for red, green and blue respectively. 
# Pin numbers for LEDs are 24 (red), 26 (green), 7 (blue)

import RPi.GPIO as GPIO
import time

pedestrian = False
pedCrossed = False

# Traffic light pins
red = 22
yellow = 27
green = 17

# Pedestrian light pins
b = 4
g = 7
r = 8
button = 15

# Traffic light durations, in seconds
redDuration = 10
yellowDuration = 5
greenDuration = 12

def button_callback(channel):
    print("Pedestrian pressed the cross walk button.") 
    global pedestrian
    pedestrian = True
    global pedCrossed
    pedCrossed = False

def on(n):
    GPIO.output(n, True)

def off(n):
    GPIO.output(n, False)

def allOff():
    off(red)
    off(yellow)
    off(green)
    off(b)
    off(g)
    off(r)

def allOnTest():
    on(red)
    on(yellow)
    on(green)
    pedRed()
    time.sleep(1)
    pedGreen()
    time.sleep(1)
    pedFlashBlue()
    time.sleep(1)
    allOff()

def init():
    GPIO.setmode(GPIO.BCM)
    GPIO.setwarnings(False)
    GPIO.setup(red, GPIO.OUT)
    GPIO.setup(yellow, GPIO.OUT)
    GPIO.setup(green, GPIO.OUT)
    GPIO.setup(b, GPIO.OUT)
    GPIO.setup(g, GPIO.OUT)
    GPIO.setup(r, GPIO.OUT)
    allOff()
    allOnTest()
    GPIO.setup(button, GPIO.IN, pull_up_down=GPIO.PUD_UP)
    GPIO.add_event_detect(button, GPIO.RISING, callback=button_callback)

def pedRed():
    off(g)
    off(b)
    on(r)

def pedGreen():
    off(r)
    off(b)
    on(g)

def pedFlashBlue():
    global pedestrian
    global pedCrossed
    off(r)
    off(g)
    length = yellowDuration
    pedestrian = False
    pedCrossed = False
    while length > 0:
        on(b)
        time.sleep(.5)
        length = length - 1
        off(b)
        time.sleep(.5)
    off(b)

def runLights():
    global pedestrian
    global pedCrossed
    off(red)
    on(green)
    if pedestrian:
        pedGreen()
        pedCrossed = True
    else:
        pedRed()
    time.sleep(greenDuration)
    off(green)
    on(yellow)
    if pedestrian and pedCrossed:
        pedFlashBlue()
    else:
        time.sleep(yellowDuration)
    off(yellow)
    on(red)
    pedRed()
    time.sleep(redDuration)

init()
while True:
    runLights()

Picture
Picture
Picture
Comments

Pre-Flight checklist

5/12/2014

Comments

 
I'm working on giving my engineers a "pre-flight" checklist for our production web sites.  This is something they can do either after a build, or first thing Monday morning, or even every morning.  It's a list of items not often checked like:
  • production error logs
  • database tables looking for frequent or long running queries
  • job logs

The idea is to be proactive and "own" the site rather than wait for something to happen, then check the logs and realize the error has been happening for several weeks.  
Comments

Training thoughts

5/8/2014

Comments

 
I have a great learning management system set up now at work.  My trick now is to create a curriculum for my engineers so that they will be exited about it, and take classes that motivate them and educate them to get to the next level.  Here are my thoughts.

New Hires

I definitely need to focus on this first.  I want to have an experience for my new hires so they can get a good foothold on the platform and how we do things.  This will be a series of classes that go a little bit into our tech platform, plus cover all the basics like how to enter time, etc.  The new hire engineer should feel comfortable navigating around these classes during the first week or so.  We have a lot of classes we teach with a live instructor the first week, that I can easily translate to eLearning.  This is a big instant win if I can get it done right.

Software Craftsmanship

There is so much opportunity here.  I want to have classes on Java Patterns, the classic GOF Patterns, Java Memory, Java Performance, etc.  Engineers, no matter what level, should be able to take these classes and learn how to improve their craft.

Work Related Technical Classes

In this area, I can focus on our framework and our processes.  These can get pretty deep and I can have some advanced classes as well as high level classes.  This can be anything from how to modify a certain area of the code, to how to properly do a code inspection.

Security

Since I deal with eCommerce, this is a huge area that is both necessary and can be educational.  In this area, I have to be careful and not make boring 2 hour videos (which I already did!  I need to re-write that one).  

Conclusion

I have a lot of topic areas to hit, but I also need to make sure that I keep the videos and training focused, fun and relatively short.  Nobody wants to sit through hundreds of slides with a boring voice over.
Comments

Jenkins Build Server

2/16/2013

Comments

 
In this blog post, I'll tell you about my Jenkins build server setup.  I'm learning new things as we go along, but here I'll write the stuff I've done so far.  We are a Java eCommerce development shop, in serious need of some upgrading to the 2000's and above.  I'm pretty new to this organization, and I am in charge of making things better.  So, I new we could use some continuous integration, so Jenkins it is. Jenkins can be as easy as 1, 2, 3, ... however there are many little things to think about when setting all of this up.  Hope my story helps you.

First Steps:

To begin with, I started with a left over windows desktop we had laying around, put it under my desk, and threw Ubuntu on it.  I just wanted a server to start playing around with.  I was able to install the tomcat version of Jenkins on there, and had it running pretty quickly.  At work, we have about 35 projects going on at one time, and each one may have more than one active branch of development.  This means the total number of builds to be configured could possibly reach about 100 after it's all said and done (that's with a CI build and a Nightly build only).   Once I tried to get connectivity to a CVS repository, I quickly figured out that I'm going to need a better solution.  That connection required SSH keys, and my managed services department really didn't like me accessing that stuff from a random box under my desk using generic logins.

We need a bigger box...

So, I enlisted the help of my managed services group and we put a box in a secure location with some decent hard drive space.  Cool, now that I had their support, I can now start to get some SSH keys set up so I can grab CVS and SVN repositories for building.  (We have a hodge podge of repositories all over the place.  That is a mess I need to clean up as well, but that's for another blog post.)  Spending a good afternoon looking at all the repositories, managed services was able to hook Jenkins up to almost all the repositories so we can start grabbing source code!  YaY!, real progress.  Now, the next issue to tackle is getting the ANT scripts to actually build the code in Jenkins.  Ha, of course it's never that easy.  Just about every script needed to be modified.  However, I needed to be careful, because I can't mess up the manual build process.  Many people with torches and pitchforks would be at my office door screaming if I did that.  So, a ci-build.xml was necessary.  This did things crazy like create the build directory before trying to clean it because build.xml didn't check to see if there was a build directory before trying to delete it.  When developers saw that kind of error before, they just created a build directory.  Ugh.  So, anyway, after some adjustments, an actual build took place!

Wow, we can actually build some software now!  What next...

Since we don't actually have any unit tests to run, we needed to start writing some.  What to write them in is the question: JUnit, TestNG, some BDD framework?  Yes, all of the above.  So, engineers went off in many directions, with new energy.  Some built JUnit tests, some did BDD using Gradle, and all of it is cool to me.  Whatever they feel comfortable with is good.  No sense in stoping the train at this point.  Maybe later, we can standardize when we see something that is the clear winner.  For now, use groovy to test Java, or scala, or whatever you want.  Just test!  And make sure Jenkins can run your tests and email you when it fails.  That's all I ask!  So, once we get some tests and some knowledge on how to test, we can talk standardization and TDD and all that.

So, in the meantime, I want to do some static analysis.  Findbugs is great, and I stumbled upon Sonar, which is like PMD and Findbugs and other stuff all rolled into one with a great dashboard for the MBA types.  Awesome, lets do this.  Sonar is relatively simple to setup.  No big issues there.  They have some great documentation.

to be continued...
Comments

    Author

    Write something about yourself. No need to be fancy, just an overview.

    Archives

    August 2019
    May 2014
    February 2013

    Categories

    All

    RSS Feed

Proudly powered by Weebly